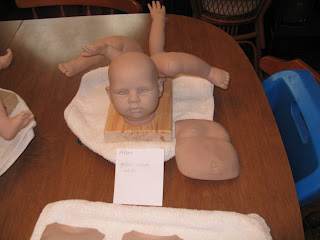
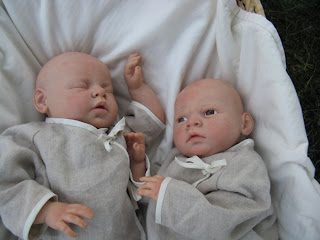
First, I will show pictures of the blank kits. Sculptors sculpt a kit from clay and then have a company make multiple vinyl versions that are sold to reborn artists like myself. There are several places online where reborn kits can be perchased. I purchased the kits for my reborn "keepers" from Doll Dreams and the kit for my sister's reborn was purchased from Bountiful Baby.
My boy keeper is from the kit Noah by Reva Schick. Here are some stock images of the blank kit
Here is my blank kit on the body I created & sewed along with my Hanna by Reva Schick. Both have anatomical belly plates from Bountiful Baby sculpted by Donna Rubert.
Here are stock images of the blank Hanna kit
The kit I painted for my sister is Honey by Donna Rubert with a generic tummy plate by Tasha Edenholm.
Here is a stock image of the Honey kit
Here is the actual blank kit on the body I created & sewed.
As a personal preference, I decided to open Hanna's eyes a bit more. So, I gently removed some of the vinyl on the upper and lower edges of her lids (primarily the lower lids) with a craft knife.
The first step in the process is to clean the vinyl with rubbing alcohol and cotton balls.
Then, they get a bath in dish soap and warm water followed by a bath in Johnson's baby soap (I love that smell!)
After letting them air dry on a drying rack overnight, they were ready to paint. I started Noah and Hanna with a thin layer of matte varnish to help the Genesis heat set paint adhere better. My sister didn't want a matte layer, which is fine for Bountiful Baby vinyl. I opened their noses using a hand held drill I had gotten from Hobby Lobby.
Then, I set up my "workshop" on the dinning room table. I usually paint in the kitchen, but at the time we were experiencing a heat wave and, even with the A/C on, sitting beside the oven was too much! Here is my set-up at the table.
If anyone is interested in the skin tone method I used, I followed along with Lara Antonucci's "Advanced Peaches and Cream" eBook which can be found at her R.E.A.L. estore. I made some of my own slight changes, but I followed fairly closely to the book. The major things I changed were to do a fairly strong blue wash instead of the fleshy mint wash because I wanted my babies to have a nice undertone. I did use the minty wash for the Honey kit and the belly plates. I also made the undertone layer that came later more blue for my babies for the same reason, I love the thin skinned look around the eyelids, temples, mouth, etc. so I made them a little more prominent than the eBook instructed.
Here are the kits after the neutralizing wash
After the first flesh layer
After a yellow ochre wash
After the first blush layer, mottling, veining (I do my veins slightly differently, I use paint after I use a Prismacolor pencil to lightly draw the vein), lips and nails.
(This is the point where I ended for the night after having painted pretty much the entire day.)
Here are some daylight pictures after the blush, mottle, veining, lips , & nails:
Then, there is a blending layer, a lavender layer to smooth the tone, and then a second layer of blush.
Next, moons for the nail beds, undertoning, and creases & wrinkles. Then, after a warm wash, the painting is completed. I decided to try my hand at drawing on the nail tips this time instead of painting them. I also decided to only paint nail moons on the thumbs and big toes because that is how my nails are. I did paint a little bit of cuticle instead of a moon on the other nails.
Painting complete:
I inserted the eyes into the Hanna kit while it was still warm so it would be easier to get them to fit into the socket. Hanna calls for 20mm eyes, but 22mm are said to open the eyes a bit more, so that is what I chose to do. I will probably insert glass eyes later, but this is what I had on hand at the moment. Also, I put bamboo BBQ skewers into the nostrils and belly plate holes while the kits cooled to keep the holes open in a nice round shape.
Next, comes assembly. I use poly pellets in the arms and legs up to the elbow or knee joint. I feel glass pellets make the limbs too heavy. I use glass pellets in the body by putting about 2-3lbs into a stocking. I knot the stocking, turn it over itself, knot it again, and [if I have enough stocking left] turn it on itself and knot it a third time, to ensure the glass pellets do not slip out. I use #1 sand blast media for my glass pellets. I also put a little less than a pound of either glass pellets or a combination of glass and poly pellets into a stocking inside the head. The poly pellets are followed by poly/fiber fill stuffing in the arms and legs. The glass pellet stockings are surrounded by poly/fiber fill in the body and head. Then, the limbs are zip tied to the body. I usually tie the head on until I am finished with rooting as I will need to remove the head for the rooting process and then to seal the hair from the inside. I do not have rooting pictures, but I do have some for assembly.
This shows the body for the Honey kit and the stocking filled with glass pellets.
Here is what they look like after assembly
Here are my keepers in daylight under the shade of a tree (they have not been rooted so no hair or eyelashes yet).


